From Blank Page to Living World. A Guide to Setting Up Your Story in AI Story Hub
A little preparation goes a long way, transforming our AI from a generic text generator into a co-pilot that understands your world, masters your tone, and respects your characters' unique voices.
Welcome, authors and world-builders! At AI Story Hub, our goal is to provide a tool that acts as a true creative partner. The key to unlocking this partnership lies in the setup. A little preparation goes a long way, transforming our AI from a generic text generator into a co-pilot that understands your world, masters your tone, and respects your characters' unique voices.
This guide will walk you through setting up your story to get the most out of our generative AI tools. Think of it as creating the DNA for your narrative.
Part 1: The Foundation - Your Story's Configuration
First, you'll start by clicking "Create New Story." The initial setup screen helps you define the broad strokes: genre, mood, point of view, etc. This is your starting point.
But for those who want to fine-tune the engine, it's time for "Pro Mode." Your story's configuration files are the master controls for the AI.
1. Tweak Your config Files (Pro Mode)
In your story's file list, you'll see several config files (config.genre, config.tone, etc.). These files contain the core instructions the AI uses.
config.genre: Define your genre with nuance. Don't just say "Urban Mystery." Use the text editor and our AI tools to describe it in detail, like in the image below. A richer description gives the AI a better blueprint.config.language&config.tone: How should your story feel? Is the language straightforward with lyrical flourishes? Is the tone casual and friendly, like a friend telling a story? Be specific. These configs guide the AI's personality.config.writingstyle: This one is SUPER important. These are the primary instructions for prose generation. Be detailed about sentence structure, sensory details, and the balance of showing vs. telling. A well-defined writing style is the single biggest factor in crafting prose you love.
Pro Tip: Before you start editing, we strongly suggest you save the default version of these files so you can always revert back!
2. Banishing Clichés with config.bannedwords
We all know large language models can be repetitive. If you notice the AI overusing words like "suddenly," "just," or "began to," add them to the config.bannedwords file. This tells the AI to avoid them.
(P.S. While we send these instructions to the models, they can be stubborn! You might still see a banned word appear occasionally, but this will greatly reduce their frequency.)
Part 2: Breathing Life into Your World
With your core style configured, it's time to build the elements that make your story unique.
3. Create Your Characters (and Their Voices!)
Go to the "characters" folder and click "Add File." Fill out the character's profile with their appearance, personality, and background.
Now for another critical step: Set the Dialogue Style. Click the menu on your character's file and select "Dialogue Style." This is where you define how this specific character speaks. Is their speech sharp and witty? Formal and verbose? This instruction is what gives each character a distinct voice during prose generation.
4. Add Other Story Elements
Flesh out your world by adding files for Themes, Plotlines, Worldbuilding, and Locations. The more context you build here, the more material the AI has to draw from later.
Part 3: Where the Magic Happens - Generating Scenes
Now it's time to write.
5. Head to the "scenes" Folder
This is your main workspace. Click "Add File" to create your first scene (e.g., "Prologue"). You can easily re-order scenes using the drag handles or up/down arrows.
First, write a simple Scene Description in the main editor. This is a high-level summary of what happens.
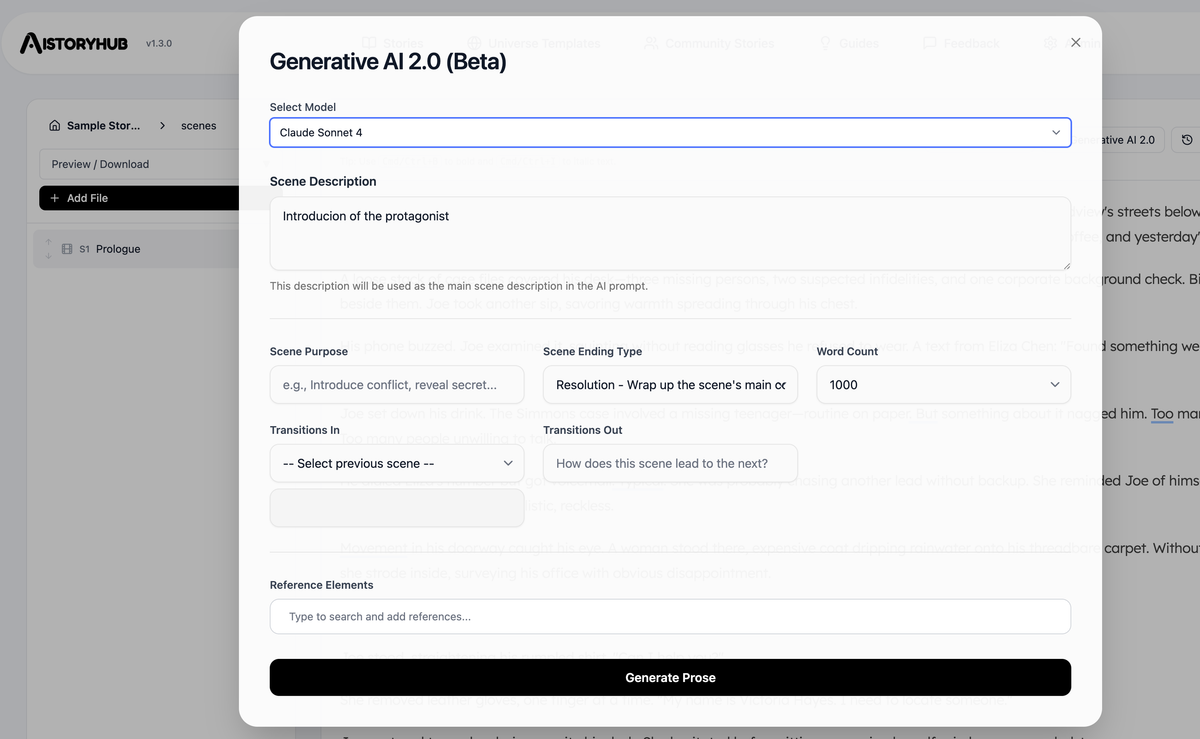
6. Fire up Generative AI 2.0
Click the Generative AI 2.0 button to open the magic modal. This is where you direct the AI.
- Select your AI Model: Choose the engine you want to use.
- Refine Your Description & Purpose: Elaborate on your initial description. What is the goal of this scene? To "Introduce the protagonist"? To "Create suspense"?
- Set Transitions & Word Count: How does this scene connect to the previous one? How should it lead to the next? Setting transitions creates narrative cohesion. You can also set your desired word count. (P.S. Some models have output limits, often around 2000 words.)
7. Use "Reference Elements" - This is Non-Negotiable!
This field is arguably the most powerful tool in the entire platform. It is SUPER IMPORTANT.
Start typing the name of a character, location, or piece of lore you've already created. When you select an element (like the character "Joe Smith"), the AI gathers all the content from that file and sends it to the language model as context.
This is how you ensure the AI remembers Joe's backstory, his limp, and his distaste for bureaucracy. It's how you get consistent, intelligent prose that is deeply rooted in your world.
8. Iterate and Refine
Once your scene is generated, the process isn't over. Use the Iterative AI 2.0 button to select a paragraph and refine it. Fix awkward phrasing, deepen the imagery, or punch up the dialogue. This is the final polish that makes the story truly yours.
By following these steps, you're not just writing a story; you're building a living world and teaching an AI how to describe it beautifully. Now go on—your architect's toolkit is ready.